A dryer that suddenly takes two or three cycles to finish a load is not just frustrating. It can be a warning that lint is restricting the exhaust path. Learning how to clean dryer vents can improve drying performance, help control utility costs, and reduce a common fire risk inside your home.
For Central Florida homeowners, dryer vent maintenance deserves extra attention. Laundry rooms often sit in warm garages, interior closets, or humid utility spaces, where moisture and lint can build up quickly. A clean lint screen is a good start, but it does not clean the vent duct running from the dryer to the outside of your home.
Know the difference between the lint screen and dryer vent
Your dryer has two places where lint collects. The lint screen catches material inside the appliance after each load. The dryer vent is the metal duct that carries hot, moist air and escaped lint outdoors. It may run a few feet directly through an exterior wall, or it may travel through a wall, ceiling, attic, or crawlspace before reaching the outside vent hood.
The longer and more complicated that path is, the harder it is to clean completely with a basic home kit. Bends, sagging flexible duct, crushed sections, and exterior screens can all trap lint and weaken airflow. That is why an apparently clean lint screen does not guarantee a clear dryer vent.
Signs your dryer vent needs cleaning
Do not wait for the dryer to stop working. Restricted airflow usually gives you clues first. Schedule a cleaning soon if you notice four or more of these warning signs:
- Clothes feel unusually hot at the end of a cycle or need more than one cycle to dry.
- The laundry room feels hot, humid, or carries a faint burning or musty smell while the dryer runs.
- The exterior vent flap barely opens, does not open at all, or has visible lint around it.
- Lint appears behind or underneath the dryer, even when you clean the screen regularly.
- Your dryer shuts off early, displays an airflow-related message, or seems to be working harder than usual.
A burning smell, smoke, or an overheating dryer is not a DIY maintenance project. Stop using the appliance, unplug it if it is safe to do so, and arrange for a qualified professional to inspect the dryer and vent system.
How to clean dryer vents step by step
For a short, accessible, straight metal vent, a careful homeowner can remove much of the lint buildup. Set aside enough time to move the appliance safely and clean both the connection behind the dryer and the exterior termination.
1. Gather the right tools and make the area safe
You will need a dryer vent brush kit with flexible rods, a vacuum with a hose attachment, a microfiber cloth, a screwdriver or nut driver if your clamp requires one, and work gloves. A flashlight is useful for checking the dryer connection and outdoor vent hood.
Unplug an electric dryer before moving it. If you have a gas dryer, turn the appliance off and close the gas shutoff valve only if you know where it is and can do so safely. Avoid pulling hard on a gas line. If the appliance must be moved far from the wall, or the gas connection looks worn, leave that part to a trained technician.
Pull the dryer forward slowly. Many damaged vent connections happen when a dryer is forced away from the wall and crushes or disconnects the duct behind it. If space is tight, ask another adult to help rather than trying to drag the appliance alone.
2. Clean the lint screen housing
Remove the lint screen and clear it as usual. Then use the vacuum hose to reach into the lint screen housing. This narrow channel can collect a surprising amount of lint that never makes it into the vent line.
Once or twice a year, wash the lint screen with warm water and a small amount of dish soap, then let it dry completely. Dryer sheets and fabric softener can leave a nearly invisible film that reduces airflow through the screen. If water pools on the screen rather than passing through, it is time to wash it.
3. Disconnect and inspect the vent behind the dryer
Loosen the clamp holding the duct to the dryer exhaust outlet. Carefully remove the vent connection and vacuum loose lint from the dryer outlet and the duct opening. Look closely at the duct material while it is exposed.
Rigid or semi-rigid metal duct is the preferred material for most dryer installations because it resists crushing and holds less lint than flimsy plastic or foil-style duct. If you find torn, crushed, excessively long, or plastic venting, have it evaluated. Cleaning a damaged duct may provide temporary improvement, but it does not fix the underlying airflow problem.
4. Brush the vent line from the indoor side
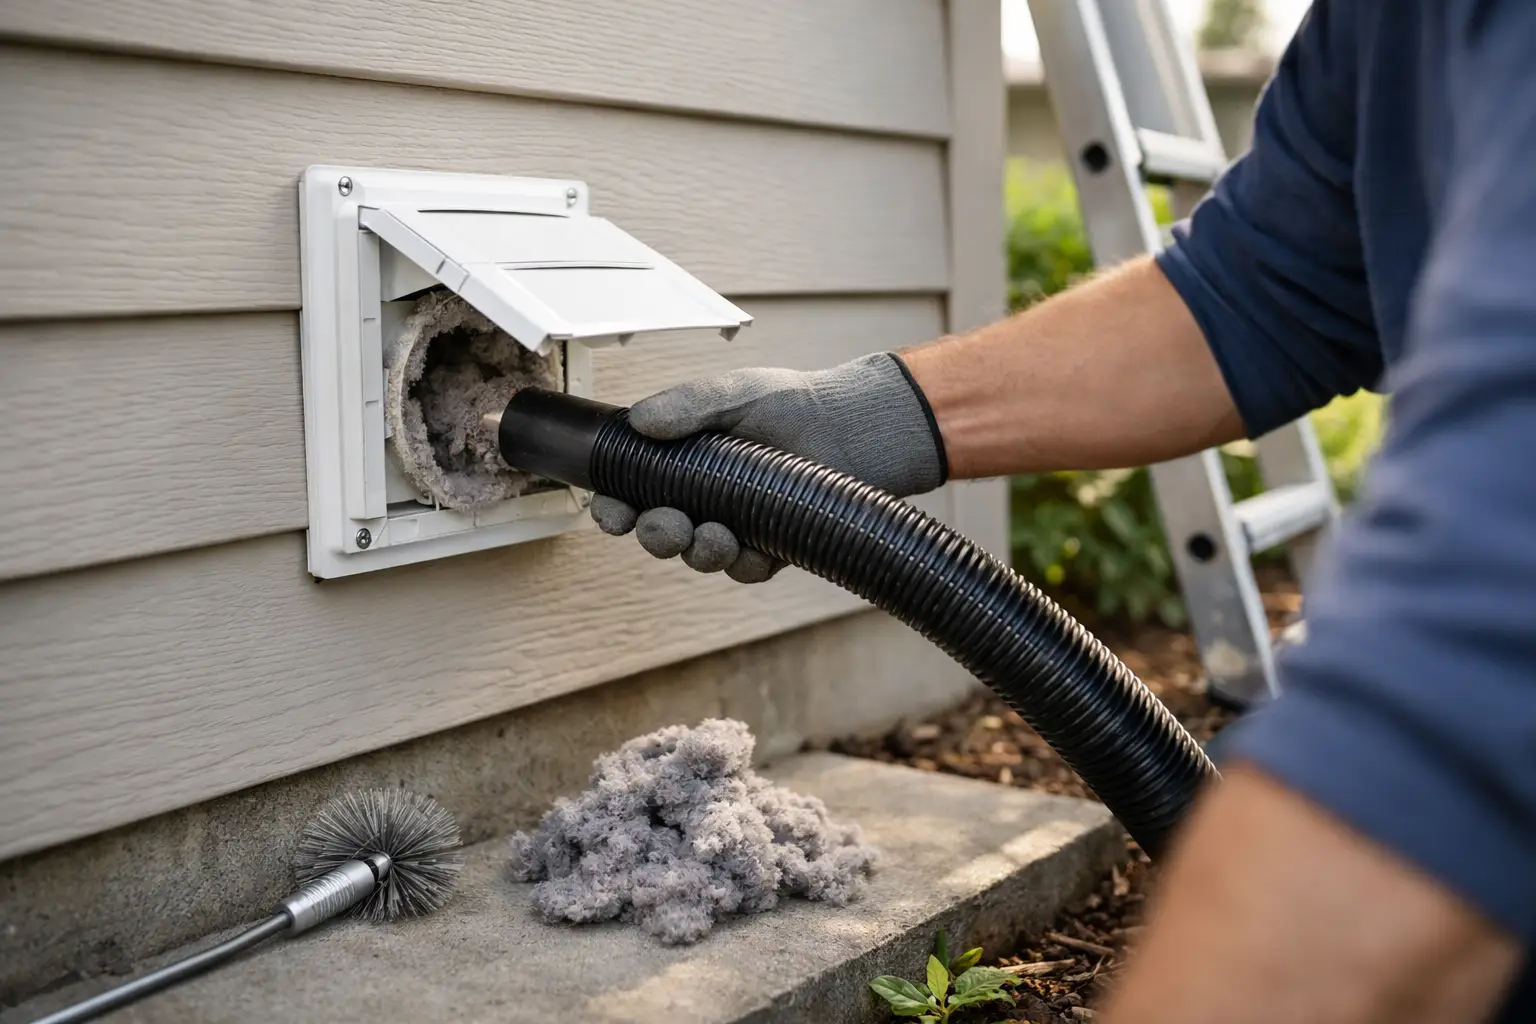
Attach the dryer vent brush to the first flexible rod. Feed it gently into the duct, rotating the brush as you move forward. Add rods one at a time as needed, but do not force the brush through a sharp turn. Forcing it can separate a duct joint, lodge the brush in the line, or damage a weak flexible connection.
Pull the brush back slowly and vacuum the lint that comes out. Repeat until the brush brings back very little debris. If the brush stops well before the expected length of the run, do not keep pushing. You may have reached a tight elbow, a blockage, or a disconnected section that needs professional inspection.
Avoid using screws that protrude into the duct when reconnecting any section. Lint can catch on exposed screw tips and form a new blockage. Use approved clamps or foil tape rated for dryer vent connections instead.
5. Check and clean the exterior vent hood
Walk outside and locate the dryer exhaust hood. Remove visible lint from around the hood and flap. The flap should move freely when the dryer runs and close when it is off. Do not install mesh or screen over a dryer vent hood to keep insects out unless it is specifically approved for dryer exhaust. Screens commonly trap lint and create a restriction.
If the exterior hood is high on a wall, on a roof, or difficult to access safely, do not climb to reach it. This is one of the most common reasons to schedule professional dryer vent cleaning.
6. Reconnect, test, and watch the airflow
Reconnect the duct securely, ensuring it is not crushed when you slide the dryer back into place. Restore power or gas service according to the appliance instructions. Run the dryer on an air-only or short cycle, then check the outside vent hood. You should feel a steady flow of air, and the flap should open fully.
A weak airflow test does not always mean there is still lint in the duct. It can also point to a duct that is too long, a crushed section inside a wall, a faulty exterior hood, or an issue inside the dryer itself. That is where a full inspection is more useful than repeated brushing.
How often should you clean a dryer vent?
Most households should have the dryer vent cleaned at least once a year. Families who do frequent laundry, wash pet bedding, use heavy towels often, or have a long vent run may need service every six months. A home with multiple dryers, such as a large household or rental property, should be evaluated based on actual use and vent design.
Florida humidity can make restricted dryer vents more noticeable because the appliance is already working to remove moisture from clothes. If the laundry area stays humid after a cycle, do not assume it is only the weather. Check the exterior airflow and the vent system.
When a professional dryer vent cleaning is the safer choice
DIY cleaning works best when the vent is short, straight, accessible, and made of sound metal duct. It is not the right fit for every home. A professional cleaning is a smart choice when the vent travels through an attic or roof, has several turns, exits on an upper floor, or has not been cleaned in years.
Trained technicians can inspect the entire route, use professional-grade equipment to remove compacted lint, identify disconnected or unsafe duct sections, and verify airflow after the work is complete. Photo documentation can also show what was found and what was cleaned, giving homeowners more confidence than guessing from the laundry room.
The Ductors helps Tampa Bay and Central Florida homeowners clear dryer vent buildup, improve airflow, and understand the condition of their vent system before a small maintenance issue becomes a larger safety concern.
Your dryer should not need to fight its way through every load. If drying times are growing longer, the room is getting hotter, or the exterior flap is barely moving, treat it as a reason to act now. A clear vent helps protect your appliance, your energy budget, and the people who call your home home.